HOME

Tuesday, September 20, 2011

வாருங்கள் கூகிளுடன் கொஞ்சம் விளையாடாலம் ! !


இணையத்தில் பல வகையான தகவல்கள் இருக்கிறது ஆனால் அவற்றை நாம் ஒவ்வொன்றாக தேடி தேடித் தான் படிக்கவேண்டும். இதற்க்கு தான் நமக்கு தேடுபொறிகள் பயன்படுகிறது. தேடுபொறி என்ற உடனே நமக்கு ஞாபகம் வருவது கூகிள் தான். கூகுளின் தேடுபொறி பற்றி நான் சொல்லி தெரிவதில்லை இணையத்தை யார் பயன்படுத்தினாலும் ஒரு தடவையாவது கூகிள்க்கு சென்று விடுவார்கள் அந்த அளவுக்கு இல்லோரும் அதனை விரும்புகின்றனர் மற்றும் பயன்படுத்துகின்றனர். இந்த கூகிள் பற்றி நிறைய விஷயங்கள் புதிதாக பலரும் எழுதிக்கொண்டு இருக்கிறார்கள்.


சரி கூகிளுடன் எப்படி விளையாடுவது அதை பற்றி பார்ப்போம்

  • கூகுளை முதலில் திறந்து அதில் GOOGLE GRAVITY என தட்டாசு செய்யுங்கள் .
  • பின்னர் அதன் கீழே உள்ள I'M FEELING LUCKY பொத்தானை அழுத்துங்கள்.
  • ஒரு தளத்திற்கு செல்லும் அங்கே பாருங்கள் கூகிள் தேடுபொறி எப்படி இருக்கிறது என்று.
  • சிறந்த விஷயம் என்னவென்றால் நாம் இதிலும் குறிச்சொல்லை கொடுத்து தேடலாம் .
  • அதுமட்டுமல்ல நீங்கள் உங்கள் சுட்டியை பயன்படுத்தி அதில் உள்ள சொற்கள் மட்டும் பெட்டிகளை இழுத்து விளையாடலாம். 

இந்த தளத்திற்க்கு செல்ல : இங்கே சொடுக்கவும்


Monday, June 27, 2011

How to start in SAFE Mode


Introduction
Windows Safe Mode is a way of booting up your Windows operating system in order to run administrative and diagnostic tasks on your installation. When you boot into Safe Mode the operating system only loads the bare minimum of software that is required for the operating system to work. This mode of operating is designed to let you troubleshoot and run diagnostics on your computer. Windows Safe Mode loads a basic video drivers so your programs may look different than normal.
For Win98/ME, XP, Vista and Windows 7 there are two methods of booting into Safe Mode, while 95 and 2000 only have one. We will describe these methods below:
F8 - By pressing the F8 key right when Windows starts, usually right after you hear your computer beep when you reboot it, you will be brought to a menu where you can choose to boot into safe mode. If it does not work on the first try, reboot and try again as you have to be quick when you press it. I have found that during boot up right after the computer shows you all the equipment , memory, etc installed on your computer, if you start lightly tapping the F8 key you will usually be able to get to the desired menu.
System Configuration Utility - You can use the System Configuration Utility, or MSCONFIG, found in Windows 98, ME, XP, Windows Vista, and Windows 7 to make Windows boot into Safe Mode on the next reboot. We will go into specific details in the sections below. Please note, that you should not force your computer to boot into Safe Mode using the System Configuration Utility if you suspect you are infected with malware as the malware may corrupt keys required to boot into Safe Mode. You can read more about this here.
Windows 95
Windows 95 can only boot into Safe Mode using the F8 method as it does not have a System Configuration Utility.
Using the F8 Method:
  1. Restart your computer.
  2. When the machine first starts it will generally list some equipment that is installed in your machine, amount of memory, hard drives installed etc. When it is finished with that it will say "Starting Windows 95". Immediately after seeing "Starting Windows 95" press the F8 key.
  3. You will now be presented with a menu. Select the option for Safe Mode using the arrow keys.
  4. Then press enter on your keyboard to boot into Safe Mode.
  5. Do whatever tasks you require and when you are done reboot to boot back into normal mode.
Windows 98/ME
NOTE: Windows ME may look slightly different than what is shown in the images below. You should still have no problem following along.
Using the F8 Method:
  1. Restart your computer.
  2. When the machine first starts again it will generally list some equipment that is installed in your machine, amount of memory, hard drives installed etc. At this point you should gently tap the F8 key repeatedly until you are presented with a menu.
  3. When you have the menu on the screen. Select the option for Safe Mode using the arrow keys.
  4. Then press enter on your keyboard to boot into Safe Mode.
  5. Do whatever tasks you require and when you are done reboot to boot back into normal mode.
Using the System Configuration Tool Method:
Step 1: Close all programs so that you have nothing open and are at the desktop.
Step 2: Click on the Start button then click on Run.
Step 3: In the Run field type msconfig as shown in the image below.
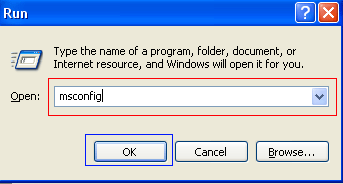
Figure 1. Starting Msconfig
Step 4: Press the OK button and the System Configuration Utility will start up. You will then see a screen similar to Figure 2 below.
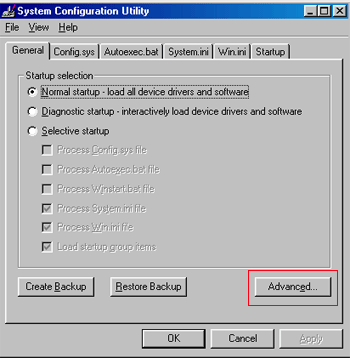
Figure 2. SCU Startup Screen
Step 5: You should now press the Advanced button designated by the red box in the figure above and you will see a screen similar to figure 3 below.
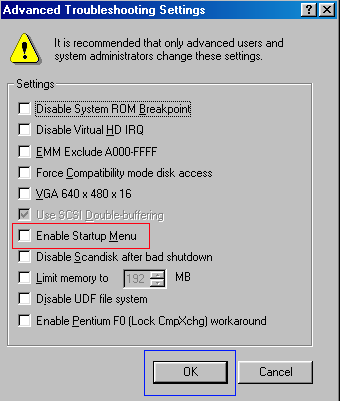
Figure 3. Advanced Options
Step 6: Place a checkmark in the checkbox labeled "Enable Startup Menu" designated by the red box in Figure 3 above. Then press the OK button and then the OK button again. Windows 98/ME will now prompt if you would like to reboot as shown in Figure 4 below.

Figure 4. Confirm Reboot
Step 7: Press the Yes button and your computer will restart into Safe Mode.
Step 8: When the computer boots up perform what diagnostic or troubleshooting tasks you require.
Step 9. When you are finished with these tasks, complete steps 1-7 again, but in Step 6 this time uncheck the checkbox labeled "Enable Startup Menu".
Step 10: Reboot the computer back into normal mode.
Windows 2000 can only boot into Safe Mode using the F8 method as it does not have a System Configuration Utility.
Using the F8 Method:
  1. Restart your computer.
  2. When the machine first starts again it will generally list some equipment that is installed in your machine, amount of memory, hard drives installed etc. When that is completed it will start loading Windows.
  3. When you see the screen that has a black and white bar at the bottom stating "Starting Windows", tap the F8 key repeatedly until you get to the Windows 2000 Advanced Options Menu
  4. At this menu use the arrow keys to select the Safe Mode option, which is usually the first in the list.
  5. Press the enter key.
  6. Your computer will continue booting, but now will boot into Safe Mode.
  7. Do whatever tasks you require and when you are done reboot to boot back into normal mode.
Windows XP
Using the F8 Method:
  1. Restart your computer.
  2. When the machine first starts again it will generally list some equipment that is installed in your machine, amount of memory, hard drives installed etc. At this point you should gently tap the F8 key repeatedly until you are presented with a Windows XP Advanced Options menu.
  3. Select the option for Safe Mode using the arrow keys.
  4. Then press enter on your keyboard to boot into Safe Mode.
  5. Do whatever tasks you require and when you are done reboot to boot back into normal mode.
Using the System Configuration Tool Method:
Note: If you are having trouble entering Safe Mode via the F8 method, you should not use this method to force it to startup into safe mode. For reasons why, you should read this.
Step 1: Close all programs so that you have nothing open and are at the desktop.
Step 2: Click on the Start button then click on Run.
Step 3: In the Run field type msconfig as shown in the image below.
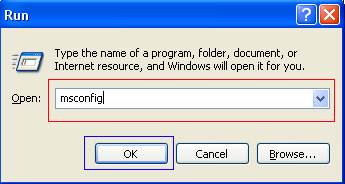
Figure 4. Starting Msconfig

Step 4: Press the OK button and the System Configuration Utility will start up. You will then see a screen similar to Figure 5 below.
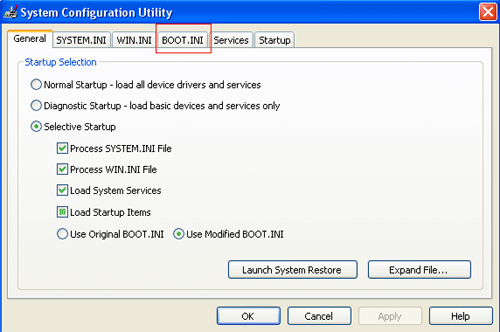
Figure 5. Starting the System Configuration Utility
Step 5: Click on the tab labeled "BOOT.INI" which is designated by the red box in Figure 5 above. You will then be presented with a screen similar to Figure 6 below.
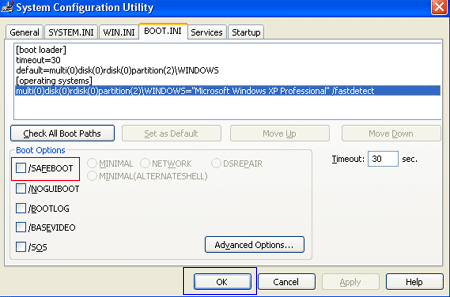
Figure 6. BOOT.INI Tab
Step 6: Put a checkmark in the checkbox labeled "/SAFEBOOT" designated by the red box in Figure 6 above. Then press the OK button. After pressing the button you will be presented with a confirmation box as shown in Figure 7 below.

Figure 7. Confirm Reboot
Step 7: Press the Restart button and let the computer reboot. It will now boot up into Safe Mode.
Step 8: When the computer boots up do what diagnostic or troubleshooting tasks that you need to do.
Step 9. When are finished with your tasks, complete steps 1-7 again, but in Step 6 this time uncheck the checkbox labeled "/SAFEBOOT". Then click on the General tab and set it for Normal startup.
Step 10: Reboot the computer back into normal mode.

Windows Vista
Using the F8 Method:
  1. Restart your computer.
  2. When the computer starts you will see your computer's hardware being listed. When you see this information start to gently tap the F8 key repeatedly until you are presented with the Windows Vista Advanced Boot Options.
  3. Select the Safe Mode option using the arrow keys.
  4. Then press the enter key on your keyboard to boot into Vista Safe Mode.
  5. When Windows starts you will be at a typical logon screen. Logon to your computer and Vista will enter Safe mode.
  6. Do whatever tasks you require, and when you are done, reboot to go back into normal mode.
Using the System Configuration Tool Method:
Note: If you are having trouble entering Safe Mode via the F8 method, you should not use this method to force it to startup into safe mode. For reasons why, you should read this.
  1. Close any running programs and open Windows so you are back at the desktop.

  2. Click on the Start () button.

  3. In the Start Menu Search Box () type msconfig and press enter on your keyboard.

  4. The System Configuration utility will open and you will see a screen similar to the one below.
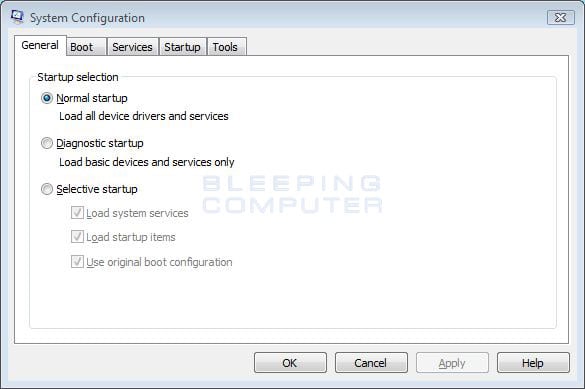


    Vista System Configuration Utility
    Figure 8. Vista System Configuration Utility


    Click on the Boot tab.
  5. You will now be at the Boot options screen as shown below.
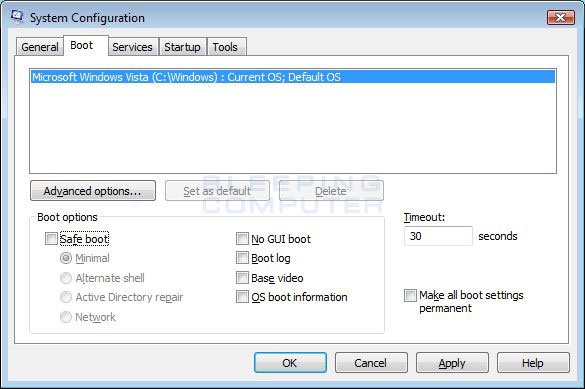


    Vista Boot tab in the System Configuration utility
    Figure 9. Vista Boot tab in the System Configuration utility


    Put a checkmark in the checkbox labeled Safe boot

  6. Press the Apply button and then press the OK button.

  7. You will now be presented with a prompt stating that you need to reboot the computer to apply the change.
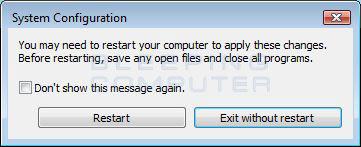


    Restart Prompt
    Figure 10. Restart Prompt


    Click on the Restart button to reboot your computer.

  8. Your computer will now restart directly into Safe Mode. When you get to the Vista logon screen, log on to the computer and perform any necessary tasks.

  9. When done with your tasks, from within Safe Mode, start msconfig.

  10. When the program is open, and you are on the General tab, select the option labeled Normal Startup.

  11. Then press the Apply button and then the OK button.

  12. When the programs prompts you to reboot, allow it to do so, and you will boot back into Windows Vista in normal mode.


Using the F8 Method:
  1. Restart your computer.
  2. When the computer starts you will see your computer's hardware being listed. When you see this information start to gently tap the F8 key on your keyboard repeatedly until you are presented with the Windows 7 Advanced Boot Options screen as shown in the image below.
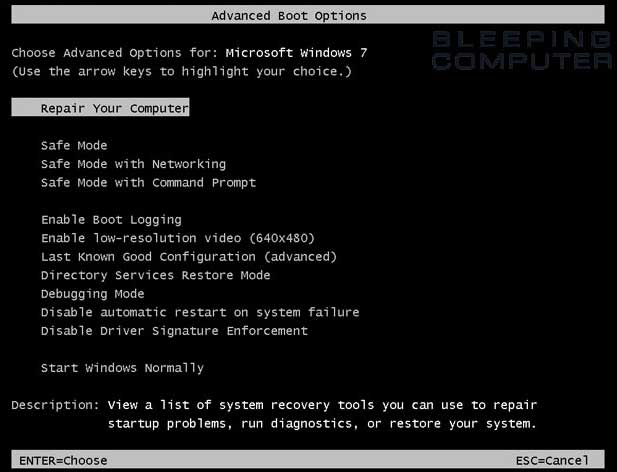

    Figure 11. Windows 7 Advanced Boot Options screen
    Figure 11. Windows 7 Advanced Boot Options screen

  3. Using the arrow keys, select the Safe Mode option you want.
  4. Then press the enter key on your keyboard to boot into Windows 7 Safe Mode.
  5. When Windows starts you will be at a typical logon screen. Logon to your computer and Windows 7 will enter Safe mode.
  6. Do whatever tasks you require, and when you are done, reboot to go back into normal mode.
Using the System Configuration Tool Method:
Note: If you are having trouble entering Safe Mode via the F8 method, you should not use this method to force it to startup into safe mode. For reasons why, you should read this.
  1. Close any running programs and open Windows so you are back at the desktop.

  2. Click on the Start () button.

  3. In the Start Menu Search Box type msconfig as shown in Figure 12 below.


    Figure 12. Windows 7 Search box
    Figure 12. Windows 7 Search box


    Then press enter on your keyboard.

  4. The System Configuration utility will open and you will see a screen similar to the one below.
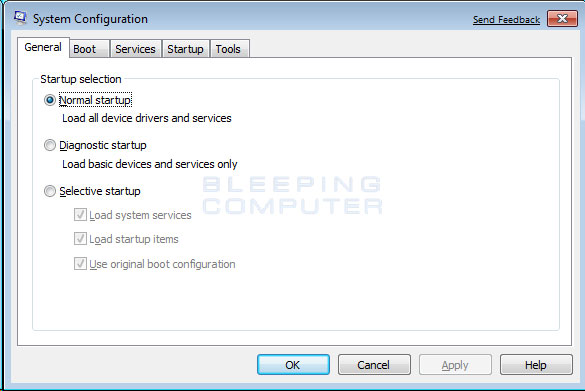


    Vista System Configuration Utility
    Figure 13. Windows 7 System Configuration Utility


    Click on the Boot tab.

  5. You will now be at the Boot screen as shown below.


    Vista Boot tab in the System Configuration utility
    Figure 14. Windows 7 Boot tab in the System Configuration utility


    Put a checkmark in the checkbox labeled Safe boot

  6. Press the Apply button and then press the OK button.

  7. You will now be presented with a prompt stating that you need to reboot the computer to apply the change.


    Figure 15. Restart Prompt
    Figure 15. Restart Prompt


    Click on the Restart button to reboot your computer.

  8. Your computer will now restart directly into Safe Mode. When you get to the Windows 7 logon screen, log on to the computer and perform any necessary tasks.

  9. When done with your tasks, from within Safe Mode, start msconfig.

  10. When the program is open, and you are on the General tab, select the option labeled Normal Startup.

  11. Then press the Apply button and then the OK button.

  12. When the programs prompts you to reboot, allow it to do so, and you will boot back into Windows 7 in normal mode.

Tuesday, June 21, 2011

Microsoft Word Shortcut Keys

ShortcutDescription
Double-click (on a word)Select the word.
Single-click (anywhere in a sentence) + Holding CTRLSelect the entire sentence.
Triple-click (anywhere in a paragraph)Select the entire paragraph.
Click, hold, drag, then releaseSelect text from the click position to release position.
Click first position, hold SHIFT key, then click 2nd positionSelect text from the 1st position to the 2nd position.
Hold ALT key, then click and dragVertical select text.
Hold CTRL key, then scroll wheelZoom in/out.


Keyboard shortcuts


ShortcutDescription
Ctrl + ASelect all (including text, graphics).
Ctrl + BBold.
Ctrl + IItalic.
Ctrl + UUnderline.
Ctrl + CCopy.
Ctrl + VPaste.
Ctrl + XCut.
Ctrl + FFind.
Ctrl + ZUndo.
Ctrl + YRedo.
Ctrl + POpen the print dialog.
Ctrl + KInsert link.
Ctrl + LLeft align.
Ctrl + ECenter align.
Ctrl + RRight align.
Ctrl + MIndent.
Ctrl + (left arrow)Moves one word to the left.
Ctrl + (right arrow)Moves one word to the right.
Ctrl + (up arrow)Moves cursor to the beginning of the paragraph.
Ctrl + (down arrow)Moves cursor to the end of the paragraph.
Ctrl + Shift + FChange font.
Ctrl + Shift + *View/hide non-printing characters.
Ctrl + DelDeletes word to the right of cursor.
Ctrl + BackspaceDeletes word to the left of cursor.
Ctrl + EndMoves cursor to the end of document.
Ctrl + HomeMoves cursor to the beginning of document.
Ctrl + SpacebarReset highlighted text to the default font.
Ctrl + 1Single-space.
Ctrl + 2Double-space.
Ctrl + 51.5-line.
Ctrl + Alt + 1Format text: heading 1.
Ctrl + Alt + 2Format text: heading 2.
Ctrl + Alt + 3Format text: heading 3.
F1Help.
F4Repeat the last action
F5Go to .
F7Spelling and grammar.
F12Save as.
F8 then (left arrow)Increase selection to the left by one character
F8 then (right arrow)Increase selection to the right by one character
Ctrl + F1Task Pane.
Ctrl + F2Print preview.
Alt + Ctrl + F2New document.
Shift + F3Cycle between capitalized formats
Ctrl + InsertCopy.
Shift + InsertPaste.
Shift + EndSelect from current position to the end of the line.
Shift + HomeSelect from current position to the beginning of the line.
Ctrl + Shift + (left arrow)Select from current position to the beginning of the word.
Ctrl + Shift + (right arrow)Select from current position to the end of the word.
Ctrl + Shift + (up arrow)Select from current position to the beginning of the document.
Ctrl + Shift + (down arrow)Select from current position to the end of the document.
Ctrl + Shift + Page UpSelect from current position to the beginning of the window.
Ctrl + Shift + Page DownSelect from current position to the end of the window.
Shift + Page UpOne screen page up.
Shift + Page DownOne screen page down.
Shift + F7Thesaurus check selected text.
Shift + F12Save.
Ctrl + Shift + F12Print.
Alt + Shift + DInsert the current date.
Alt + Shift + TInsert the current time.

Windows XP Paint Secrets


Create a trail image
  1. Open Paint, then open an image.
  2. Right-click on the image and select "Select All"
  3. Now hold the "Shift" key and move the image around. The image will be drawn with trail.
10x Zoom
  1. Open Paint, then open a small image.
  2. Select the zoom "Magnifier" tool.
  3. Windows Paint lists out the zoom options from 1x to 8x, but there is a 10x...
  4. After selecting the Magnifier tool, point the mouse right at the border line right under "8x" and left-click. There you go.. the hidden 10x.


Game Secrets
 Solitaire: Instant Win
  1. Press Alt + Shift + 2 to instantly win
 Solitaire: Draw only 1 card (instead of 3)
  1. Hold down Ctrl + Alt + Shift then click on unopen cards to draw.
 FreeCell: Instant Win
  1. Hold down Ctrl + Shift + F10 while playing, then click Abort.
  2. Now move one card.
 FreeCell: Hidden Game Modes
  1. Go to "Game" menu choose "Select Game"
  2. Here you can choose from game mode 1 to 1,000,000. But -1 and -2 will also work (hidden modes)
 Hearts: Show All Card
    Warning! this requires a modification on your registry. Be sure you follow the steps carefully. Damage your registry might damage your Windows.
  1. Open the "Registry Editor" by: "Start" >> "Run" then type "regedit" and press Enter
  2. Expand to HKEY_CURRENT_USER\Software\Microsoft\Windows\CurrentVersion\Applets\Hearts
  3. Right-click on the right panel and create a new String value with the name "ZB"
  4. Double-click to open this key "ZB" to edit its value. Then enter "42" and close the Registry Editor.
  5. Start Hearts and Press Ctrl + Alt + Shift + F12 to show all the cards
 Minesweeper: Stop The Timer
  1. When you start to play a new game, the timer is ticking...
  2. Press Windows Key + D to show desktop.
  3. Now come back to the game by selecting it from the taskbar. The timer is stopped.
 Pinball
  1. Unlimited Balls: Type bmax at a new game to get unlimited balls (no notification).
  2. Extra Balls: Type 1max at a new game to get extra balls.
  3. Gravity Well: Type gmax at a new game to activate Gravity Well.
  4. Promotion: Type rmax at a new game or while playing to get instant promotion and raising rank.
  5. Extra points with partial shots: Partially shot the ball just to pass the yellow light bars. There are 6 bars. With the first bar, you'll get 15,000 points, 2nd: 30,000,...
  6. Extra points with partial shots: Partially shot the ball just to pass the yellow light bars. There are 6 bars. With the first bar, you'll get 15,000 points, 2nd: 30,000,...
  7. Test Mode: Type hidden test with a new ball or new game. Now you can use your mouse to drag and move the ball where you want.

Windows XP Notepad Secrets


Create a log
  1. Open Notepad
  2. On the very first line, type in ".LOG" (without quotes) then press Enter for a new line
  3. Now you can type in some text if you want, then save the file.
  4. Next time when you open the file, notice its contents. Notepad automatically adds a time/date log everytime you open the file.
Text becomes unreadable
  1. Open Notepad
  2. On the very first line, type in "dont eat the donut" (without quotes) then save and close the file. Note: the file should have only one line of the text above.
  3. Now, open the same file. You'll notice the text becomes unreadable squares. (try this with different text with the same format and length).
ets

Sunday, June 19, 2011

 நாம் தினமும் சிடி,கம்ப்யூட்டர்ஹார்ட் டிஸ்க் மற்றும் பென்டிரைவ் ஆகியவற்றைஉபயோகப் படுத்துகிறோம். இதில் டிவிடி களில் GB களில் அதன் கொள்ளளவு இருக்கும். அது மட்டும் இன்றி சில பாடல்கல் MBகளில் இருக்கும். இவற்றிற்க்கு இடையே உள்ள வேறுபாடு சிலறுக்கு குழப்பமாக இருக்கும்.அவற்களுக்காக இந்த வேறுபாட்டு  அளவுகளை கிழேகொடுத்துள்ளேன்.
8 Bit                       = 1 Byte
1,024 Bites             = 1 Kilo Byte (KB)
1,024 Kilo Bytes    = 1 Mega Byte (MB)
1,024 Mega Bytes   = 1 Giga Byte (GB)
1,024 Giga Bytes    = 1 Tera Byte (TB) 
1,024 Tera Bytes    = 1 Petta Byte (PB)
1,024 Petta Bytes   = 1 Exa Byte (EB)
1,024 Exa Bytes     = 1 Zetta Byte (ZB)
1,024 Zetta Bytes   = 1 Yotta Byte (YB)
 

VLC Media Player அனைவரையும் கவரும் புதிய பதிப்பு..........

VLC மீடியா பிளேயர் பற்றி தெரியாதவர்கள் யாரும் இருக்க முடியாது அந்த அளவிற்கு பிரபலமான மென்பொருளாகும். நம் விண்டோஸ் கணினியில் டீபால்ட்டாக விண்டோவ்ஸ் மீடியா பிளேயர் இன்ஸ்டால் செய்து இருக்கும் ஆனால் அதில் நிறைய வீடியோ பார்மட்டுகள் பார்க்க முடியாது. அதற்க்கு codec நிறுவ வேண்டும். இந்த பிரச்சினைகளால் நாம் VLC மீடியா பிளேயர் உபயோக படுத்துகிறோம். இதில் பெரும்பாலான பார்மட்டுகளில் வீடியோக்களையும் ஆடியோயோக்களையும் கண்டு ரசிக்கிறோம். இப்பொழுது VLC பிளேயர் புதிய பதிப்பு 1.1.9 வந்துள்ளது. ஆகவே இதன் முந்தைய பதிப்பான (1.1.7 and 1.1.8) உபயோகிப்பவர்கள் இந்த புதிய பதிப்பை டவுன்லோட் செய்து பயன்படுத்தி கொள்ளுங்கள்.  

புதிய பதிப்பில் சில வசதிகள்:
  • இந்த புதிய பதிப்பில் நீங்கள் இணையத்தில் இருந்து வீடியோவையை டவுன்லோட் செய்யாமலே அதன் ஸ்ட்ரீமிங் URL கொடுத்தால் நம் வீடியோவை பார்த்து கொள்ளலாம்.
  • இந்த புதிய பதிப்பு கணினியின் பாதுகாப்புக்கு முக்கியத்துவம் அளித்து உருவாக்கப்பட்டுள்ளது. இதனால் சில பாதிப்புக்கு உண்டான வீடியோக்கள் தடை செய்யப்படும். சப்போர்ட் செய்யும் வீடியோ பார்மட்டுக்கள்:

  • MPEG-1/2, 
  • DIVX (1/2/3),  
  • MPEG-4 ASP, DivX 4/5/6, XviD, 3ivX D4
  •  H.261, 
  • H.263 / H.263i, 
  • H.264 / MPEG-4 AVC, 
  • Cinepak, 
  • Theora
  • Dirac / VC-2
  • MJPEG (A/B)
  • WMV 1/2
  • WMV 3 / WMV-9 / VC-1
  • Sorenson 1/3 (Quicktime)
  • DV (Digital Video)
  • On2 VP3/VP5/VP6
  • Indeo Video v3 (IV32)
  • Indeo Video 4/5 (IV41, IV51)
  • Real Video 1/2, Real Video 3/4
 சப்போர்ட் செய்யும் ஆடியோ பார்மட்டுக்கள்:
  • MPEG Layer 1/2
  • MP3 - MPEG Layer 3
  • AAC - MPEG-4 part3
  • Vorbis
  • AC3 - A/52 (Dolby Digital)
  • E-AC-3 (Dolby Digital Plus)
  • MLP / TrueHD">3
  • DTS
  • WMA 1/2
  • WMA 3
  • FLAC
  • ALAC
  • Speex
  • Musepack / MPC
  • ATRAC 3
  • Wavpack
  • Mod (.s3m, .it, .mod)
  • TrueAudio (TTA)
  • APE (Monkey Audio)
  • Real Audio
  • Alaw/µlaw
  • AMR (3GPP)
  • MIDI
  • LPCM
  • ADPCM
  • QCELP
  • DV Audio
QDM2/QDMC (QuickTime)


இந்த மென்பொருளை டவுன்லோட் செய்ய  download VLC

பல ’OS’களை ஒரே கணினியில் நிறுவ.....

கணினி பயனாளர்கள் சிலறுக்குமற்றொறு ஆப்ரேட்டிங் சிஸ்டத்தை (O.S) நிறுவி பார்க்க வேண்டும் என்ற  ஆசை இருக்கும். ஆனால் அனைவராலும் ஆப்பரேடிங் சிஸ்டத்தை நிறுவ சந்தர்ப்பம்கிடைப்பதில்லை , மேலும் ஆப்ரேட்டிங் சிஸ்ட்டத்தை நிறுவ சிலருக்குதெரிந்திருப்பதில்லை.


இதனால் கணிணியில் குறைபாடு வந்துவிடுமோ என்ற பயம். கணினியில் ஆப்ரேட்டிங் சிஸ்டங்களை நிறுவி பார்க்க விரும்புவோர் “Wmware Workstation” என்ற மென்பொருள்
மூலம் மற்றொறு O.S நிறுவ முடியும். ஆப்ரேட்டிங் சிஸ்ட்டத்தை நிறுவமட்டுமல்ல அதனை பின்பு பயன்படுத்தவும் முடியும் இதனால் நமது கணினிக்கு எந்த விதபாதிப்பும் வாராது.


மென்பொருளை தரவிறக்க: http://downloads.vmware.com/d/info/desktop_downloads/vmware_workstation/7_0


இந்த மென்பொருள் Windows மற்றும் Linux ஆப்ரேட்டிங் சிஸ்ட்டங்களில்இயங்குமாறு வடிவமைக்கப்பட்டுள்ளது.

Wmware workstation மென்பொருளின் பல வசதிகள் உள்ளன நாம் ஆப்ரேட்டிங் சிஸ்டத்தை நிறுவும் போதோ அல்லது Wmware Workstation னுள் நிறுவப்பட்ட ஆப்ரேட்டிங் சிஸ்ட்டதில்
ஏதாவது வேலை பார்க்கும் போது அதனை VIDEO அல்லது IMAGE
படம் பிடிக்கவும் முடியும்.


இந்த மென்பொருளின் முக்கிய சிறப்பு, இதன் மூலம் 2  ஆப்ரேட்டிங் சிஸ்டங்கக்ளையும் ( O.S )  ஒரே நேரத்தில் இயக்க முடியும் என்பதே.

Thursday, May 19, 2011

Use Pen drive as RAM (Vista/Windows 7)

Recently i came across an article that said that Pen Drive can be used to speed up windows vista.USB 2.0 and above, SD card, Compact Flash or any other massive portable flash drive can be used to speed up the working of vista using the ReadyBoost feature.  When a removable memory device such as a USB flash drive is first inserted into a port, vista checks if it is fast enough to work with the Superfetch mechanism that ReadyBoost uses. If so,we are asked if we want the drive to be used for improving system performance. We can then choose to allocate part of a USB drive's memory to speed up performance and use the remainder to store files.      The performance is drastically improved.In some cases a system whose memory is increased from 512MB to 1 GB through the external plugged device can see the speed improving from 11 sec to 2 sec. The performance is even better in the case of laptop systems as laptops have a relatively low 'rpm's than the desktop systems.It also saves the battery power of the laptops.

Harsha's Blog: Use Pen drive as RAM (Vista/Windows 7)

Harsha's Blog: Use Pen drive as RAM (Vista/Windows 7): "Recently i came across an article that said that Pen Drive can be used to speed up windows vista.USB 2.0 and above, SD card, Compact Flash o..."

Tuesday, May 10, 2011

Windows Help viewer keyboard shortcuts

Press this key
To do this

Alt+C

Display the Table of Contents

Alt+N

Display the Connection Settings menu

F10

Display the Options menu

Alt+Left Arrow

Move back to the previously viewed topic

Alt+Right Arrow

Move forward to the next (previously viewed) topic

Alt+A

Display the customer support page

Alt+Home

Display the Help and Support home page

Home

Move to the beginning of a topic

End

Move to the end of a topic

Ctrl+F

Search the current topic

Ctrl+P

Print a topic

F3

Move the cursor to the search box

Windows Journal keyboard shortcuts

Press this key
To do this


Ctrl+N


Start a new note

Ctrl+O

Open a recently used note

Ctrl+S

Save changes to a note

Ctrl+Shift+V

Move a note to a specific folder

Ctrl+P

Print a note

Alt+F4

Close a note and its Journal window

Ctrl+Z

 Undo a change

Ctrl+Y


Redo a change

Ctrl+A

Select all items on a page


Ctrl+X

Cut a selection

Ctrl+C

Copy a selection to the Clipboard

Ctrl+V

Paste a selection from the Clipboard

Esc

Cancel a selection

Delete

Delete a selection

Ctrl+F

Start a basic find

Ctrl+G

Go to a page

F5

Refresh find results

F5

Refresh the note list

F6

Toggle between a note list and a note

Ctrl+Shift+C
 
Display a shortcut menu for column headings in a note list

F11

View a note in full-screen mode

F1

Open Journal Help